INTRODUCTION
Hello everyone welcome to group 32 blog on formatting an electronic worksheet. We all can recall on our previous lesson on the importance of an electronic spreadsheet. Some of the importance of electronic spreadsheet is.
- Spreadsheets are free to use
- It is easy to manipulate and analyze data
HOW TO ALIGN TEXT
Our next subtopic to describe how to change text Alignment, merge cells, and
Wrap text.
Alignment of text means positioning of text in a cell either at the left, top, middle or bottom of the cell.
STEPS OF ALIGNING TEXT
- Select the cell or group of cells containing the text.
- Click on the home tab
- Go to the alignment group.
- Select the alignment you wish to apply
- Top align
- Middle align
- Bottom align
Click on the link below to watch the tutorial on how to align text in an Excel Spreadsheet.
👇
A PODCAST IN PODOMATIC FOR YOU TO LISTEN
Below is a podcast explaining how to align text in an excel Spreadsheet. I entreat each and every students to watch and listen and practice along.
👇
HOW TO MERGE CELLS IN AN ELECTRONIC SPREADSHEET
Our next topic we will talk about is how to merge cells. Merging cells means combining two or more continuous cells together.
 |
| merging a cell |
STEPS INVOLVED IN MERGING CELLS
- Open the excel document; Double-click an Excel document to open it in Excel. If you haven't yet created the document, open the Excel program and click Blank Workbook.

2. Select the cells you want to merge. Click on one cell and use the mouse to drag to the other. eg, the two subject on the image.

3. Click on the home tab. It is on the left side of the excel windows. A drop down will appear, Click on "merge & Center" or choose the type of merging you prefer. But selecting the merge & center without choosing any of the drop down menu automatically select the merge & center.

With merging cells, you have the following options to choose from
- Merge and center
- Merge Across
- Merge cells
- Unmerge Cells
Merge across: Merge across means only the columns will be merged, the alignment state of the row will be preserved.
Merge and center: Merge and Center means combine the selected rows into one row. Only the left cell value is preserved. The alignment will be center.
Unmerge cell: To unmerge a cell means not merging the cells. Is the opposite of merge cells. To unmerge a cell, you follow the same steps of merging but this time you choose unmerge cells from the drop down list from the Merge & center tab
A video tutorial will be posted underneath to explain everything for everyone to practice. If you have any question up to this point in the lecture you can provide it at the comment section provided.
👇
A PODCAST IN PODOMATIC FOR YOU TO LISTEN
Below is a podcast explaining how to merge cells in an excel file. I entreat each and every students to watch and listen and practice along.
👇
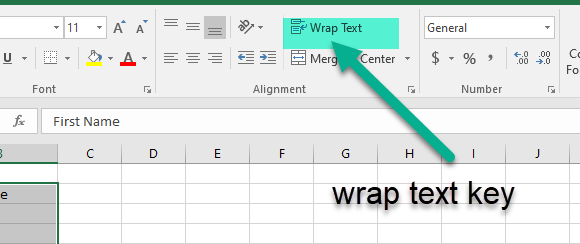
HOW TO WRAP TEXT IN AN EXCEL
Wrap text means wrap extra long text into multiple lines you can see all of it. Microsoft Excel can wrap a text so it appears on multiple lines in a cell. You can format the cell so the text wraps automatically or enter a manual line break.
NOTE: When auto row height is not enabled, this might not work.
STEPS INVOLVED TO WRAP A TEXT IN MICROSOFT EXCEL
- In the worksheet, select the cells you want to format.

2. On the Home tab, in the Alignment group, click Wrap Text. (On Excel for desktop, you can also select the cell, and then press Alt + H + W.) .
3. Adjust the row height to make all wrapped text visible.
- Select the cell or range for which you want to adjust the row height.
- On the Home tab, in the cells group, Click format.
- Under the cell size do one of these; to automatically adjust the row height, Click Autofit Row Height, to specify the row height click the row and height and adjust the row and height in the row height box.
A video tutorial will be posted underneath to explain everything for everyone to practice. If you have any question up to this point in the lecture you can provide it at the comment section provided.
👇
A PODCAST IN PODOMATIC FOR YOU TO LISTEN
Below is a podcast explaining how to wrap a text in an excel file. I entreat each and every students to watch and listen and practice along.
👇
HOW TO ACCESS THE BORDER AND SHADING FEATURES OF AN EXCEL SHEET
HOW TO APPLY BORDERS IN AN EXCEL SHEET
Our next topic on the lesson is on how to access the borders and shading features of an excel sheet or spreadsheet. Borders are the boxes formed by lines in the cell in Excel. Generally, cell borders are used to accent a specific section of a spreadsheet to make it stand out. For example, you can insert a border to draw attention of viewers to totals or other important data on the sheet.
By keeping borders, we can frame any data and provide them with a proper define limit.
By using predefined border style, you can quickly add a border around cells or ranges of cells.
If predefined cell borders do not meet your needs, you can create a custom border.
NOTE: Cell borders that you apply appear on printed pages. If you do not use cell borders but want worksheet gridline borders to be visible on printed pages, you can display the gridlines
Today, we are going to focus on how to apply borders in an excel.
STEPS INVOLVED TO APPLY BORDERS TO EXCEL SHEET
1. Select a cell or range of cells to which you want to add borders.

2. On the Home tab, in the font group, click the down arrow next to the Borders button, and you will see a list of the most popular border types.

3. Click the border you wish to apply, and it will be immediately added to the selected cells.

A video tutorial will be posted to assist you on how to apply borders in an Excel sheet.
Below is a video on how to apply borders in an excel sheet.
A PODCAST ON HOW TO APPLY BORDERS ON AN EXCEL
Below is a podcast explaining how to wrap a text in an excel file. I entreat each and every student to listen and practice along.
👇
HOW TO APPLY THE SHADE FEATURES IN AN EXCEL SHEET
By default, the Excel cells have no borders and use the white shades. Borders or shades can help make data easy to read or highlight when we have a large data set.
Shading refers to an artistic design or color used as a background of a cell in a worksheet.
When adding shading (background color) to one or more cells, we can choose one of the predefined colors set for a specific cell. Additionally, we can also choose a custom color for the desired cell.
Let us now discuss how we can add/remove color or shading from a cell within an Excel worksheet.
STEPS INVOLVED IN TO APPLY SHADES FROM THE RIBBON
1. First, select the cells you want to apply the shading.

2. After selecting the desired cells, you must navigate the Home tab and click the drop-down icon next to the "fill Color" option, as shown below:

3. Excel displays various colors under the Theme Colors and Standard Colors in the next window.

Below is a link to a video on how to apply shades to an electronic spreadsheet.
👇
Click on the link to access the video on how to apply shades in excel
A PODCAST ON HOW APPLY SHADINGS TO AN EXCEL SPREADSHEET
Below is a podcast explaining how to wrap a text in an excel file. I entreat each and every student to watch and listen and practice along.
Click on the link to access the podcast.
SUMMARY OF THE LESSON
- The above lesson was to teach us how to align text(i.e., either Top align, Middle align, Bottom align, align to the left, right or center), wrap text and merge cells (i.e., either merge & center, merge across or unmerge cells), in an Excel spreadsheet.
- Our second lesson was on how to apply the borders and shading features in an Excel Spreadsheet.
ASSIGNMENT
Use the below link to do a group project and the assignment
👇
GROUP MEMBERS THAT COLLABORATED
1. PRISCILLA SAM 5191040349
2. HALBERT TAWIAH TEYE 5191040352
3. RICHARD OPPONG 5191040348
4. BISMARK SAKYI 5191040351
5. OSEI SARPONG 5191040350


Is a very nice lesson
ReplyDelete